
|
|
|
Your donations help keep this valuable resource free and growing. Thank you.
|
63-66 Cowl Floor Repair (above heater) |
Post Reply 
|
Page 123> |
| Author | |
farna 
Supporter of TheAMCForum 
Moderator Lost Dealership Project Joined: Jul/08/2007 Location: South Carolina Status: Offline Points: 19676 |
 Post Options Post Options
") Thanks(0) Thanks(0)
 Quote Reply Quote Reply
 Topic: 63-66 Cowl Floor Repair (above heater) Topic: 63-66 Cowl Floor Repair (above heater)Posted: Feb/18/2016 at 6:28am |
|
This is something that is a bit hard to tackle. I was asked to fix one for someone who just bought a 63 Classic that I had at my shop for someone else. It was suggested I write this up to help others. Great idea! Posted it here instead of Member Projects, since this is body specific.
First step is to remove the heater box on the inside of the car so just how much rust can be determined. If you're lucky it's just around the upturned lip above the heater box where it gets fresh air. If that's it, and the majority of the lip is still intact and reasonably solid, just do a little repair work. Clean as best you can, especially inside the lip, and seal the small holes where the lip turns up. This is a hidden area, so you're pretty free as far as repair material. Fiberglass works well, but you can just use something like a good paintable caulk (I prefer paintable over silicone because you can paint it afterwards, which hides further hides the repair, and it's water cleanup -- silicone requires paint thinner to clean, and you have to get it all over your hands) smeared over the holes if small. If too large for that but still not very large (say around 1/4", pencil size, holes) you can use fiberglass drywall tape (the mesh type) to reinfore the area. Smear the caulk around the hole, press in the tape, then smear some on both sides of the hole and cover the tape in the solid areas. I've used this method to repair roofs (mesh tape embedded in roofing cement) and seal seams between dissimilar materials (like metal and wood -- caulk the seam, smear around area, embed tape, smear over to fully cover). This creates a flexible seal that won't crack until the caulk eventually gets hard -- 20 years or so if protected from the sun. The cowl lip doesn't get exposure to the sun or direct exposure to the elements, so this should be a more or less permanent repair. Body seam sealer will work also, but it's about the same as caulk, just costs more and is harder to find. |
|
|
Frank Swygert
|
|
 |
|
|
farna
Supporter of TheAMCForum
Moderator Lost Dealership Project Joined: Jul/08/2007 Location: South Carolina Status: Offline Points: 19676 |
Post Options
Thanks(0)
Quote Reply
Posted: Feb/18/2016 at 6:45am |
|
The first step in removing the heater box is to drain the cooling system. Then remove the two hoses from the heater core. If you have those spring clamps the factory used good luck! they are hard to get to, even if you have a pair of spring clamp pliers (have holes and notches in the jaws for the ends of the clamps -- helps a lot!). I replace them with screw type hose clamps, and recommend it unless you just want to keep it 100% stock. If one has been replaced you may as well replace all.
You don't have to remove the hoses from the heater control, or remove the control cable from the valve. The entire assembly comes off the heater box without removing hoses and cables. Of course it doesn't need to come off if you don't need to remove the fan box. It will be easier to reach the heater hoses where they penetrate the firewall with the hose between the valve and firewall disconnected. Instead of removing both hoses from the control I elected to remove the control assembly as a whole, just removed the engine to valve hose. You can remove the hose from the engine itself if that's easier and you don't want to disturb the valve too much. 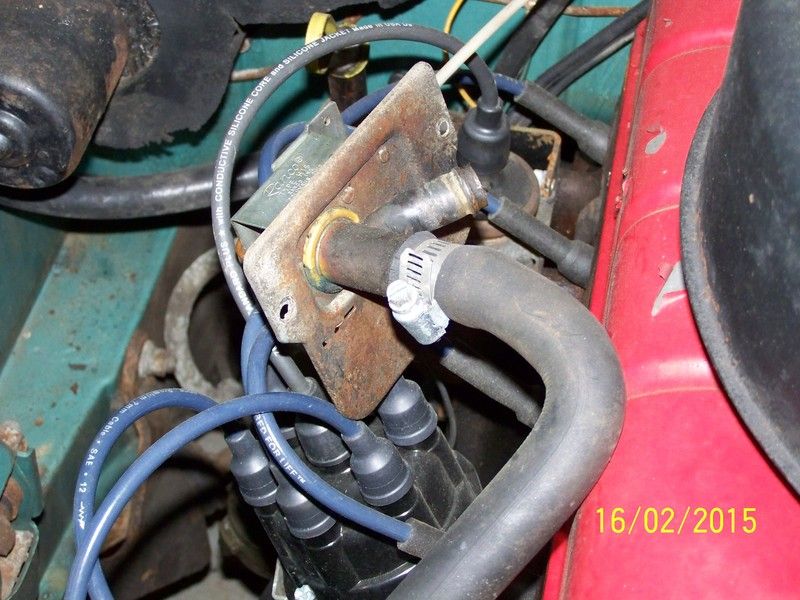 Before removing the heater box inside, remove the glove box door (unscrew hinge from dash, leave on door) and the plastic glove box itself. Remove screws around the box opening then push the box back and down to remove. That creates a LOT of clearance! Here's the heater box with heater core. If you have doubts about the core, now's the time to replace it! At the very least back flush it good with a water hose. See the two studs near the bottom? Those go through the firewall and fan box under the hood. The nuts have to be removed from under the hood, of course. All other screws holding the heater box under the dash are removed from inside. 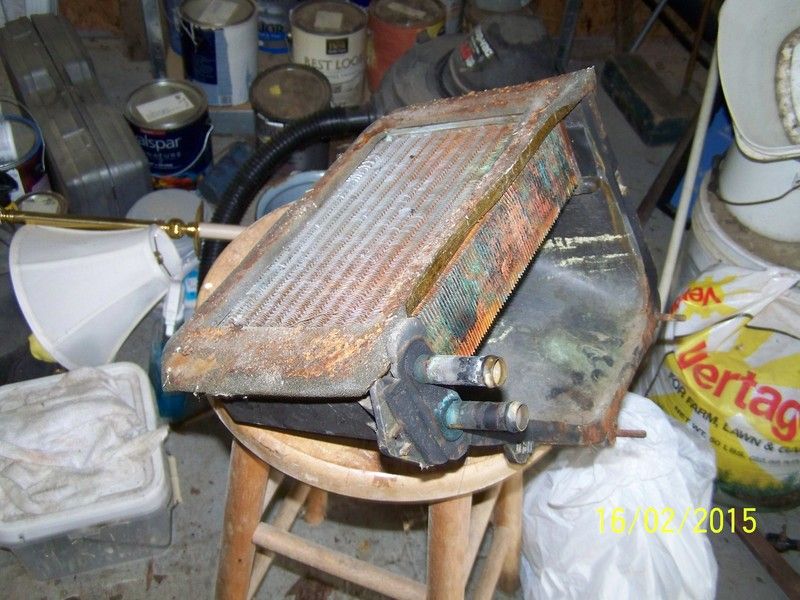 Edited by farna - Feb/18/2016 at 6:49am |
|
|
Frank Swygert
|
|
|
|
|
farna
Supporter of TheAMCForum
Moderator Lost Dealership Project Joined: Jul/08/2007 Location: South Carolina Status: Offline Points: 19676 |
Post Options
Thanks(0)
Quote Reply
Posted: Feb/18/2016 at 7:00am |
|
So here is what I found (looking through glove box opening):
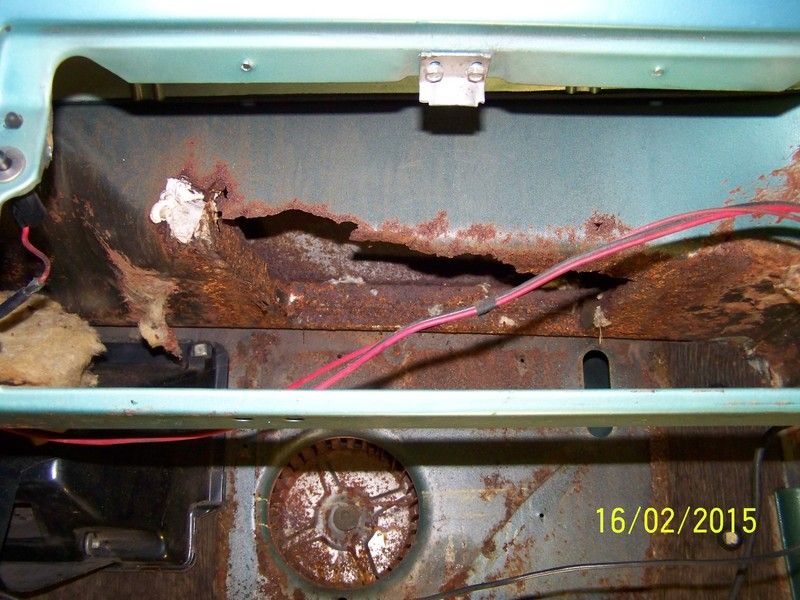 The front and sides of the lip are pretty much gone, rear lip is intact. This one is pretty bad, but not the worse I've seen... I think that one was my car (shown below): 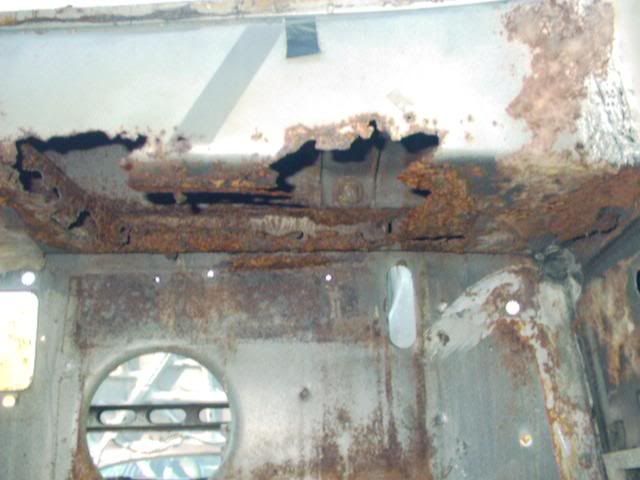 Again, the above photo is from a DIFFERENT CAR!! Another photo of the car being repaired, from below: 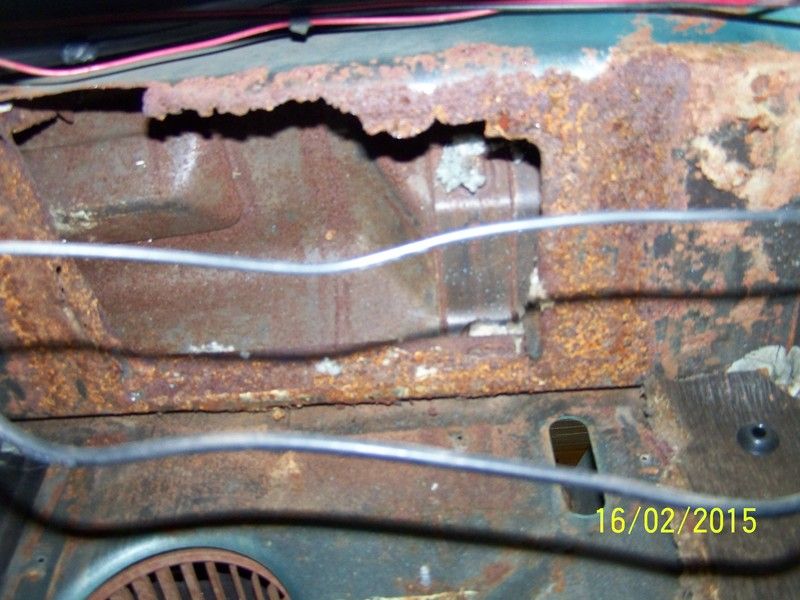 After studying the photos a bit I'm not so sure my car was much worse, just different. Mine was rusted more toward the firewall, which is more typical, this car was rusted more toward the front. I found a mouse nest in this car's heater box that had been there a while. With so little rust on this car elsewhere, I think the cowl floor rust-out was caused by the mice urinating in the nest more than water and trash coming in and collecting around the lip. That would explain how far the rust came up in the rear of the cowl (rear being toward the rear of the car) instead of the tighter area in front as rusted most in mine and others I've seen. From the photos this car appears to be worse than mine, actually... okay, let's call it a draw... Edited by farna - Feb/18/2016 at 4:12pm |
|
|
Frank Swygert
|
|
|
|
|
CommodoreHornblow
AMC Fan 
Joined: Feb/18/2016 Location: Nyack NY Status: Offline Points: 1 |
Post Options
Thanks(0)
Quote Reply
Posted: Feb/18/2016 at 10:02am |
|
Wow, Frank, glad it's you doing the repair, and not me!
|
|
|
|
|
farna
Supporter of TheAMCForum
Moderator Lost Dealership Project Joined: Jul/08/2007 Location: South Carolina Status: Offline Points: 19676 |
Post Options
Thanks(0)
Quote Reply
Posted: Feb/18/2016 at 4:40pm |
|
What you don't see in the photos is the defroster duct. If you look at the last photo above, you can just see the bottom of it, with the red wire taped to it. That duct has to come out to make the repairs. THAT is the most irritating thing with the dash in. When I did my car the dash was out, so it was easy. It's not easy to take the dash out though, not unless you have the windshield out. There is a row of screws under the windshield seal holding the top of the dash in, so removing the dash isn't an option for most. If your windshield is out or coming out, you might want to though.
The defroster duct is attached to the dash with four nuts on studs attached to the dash, one on each end and two close to the center. The ends aren't to hard to get to with a long extension and socket. The inner two must come off with a wrench. The passenger side inner isn't to hard to get to, the driver's side is a PITA! To get to it, the instrument cluster has to come out. I removed the driver's side ash tray so I could see the screw, but it doesn't help much -- just let's you know you have to remove the cluster. Here's the driver's side screw -- viewed through the instrument cluster opening. That's the wiper control to the right. 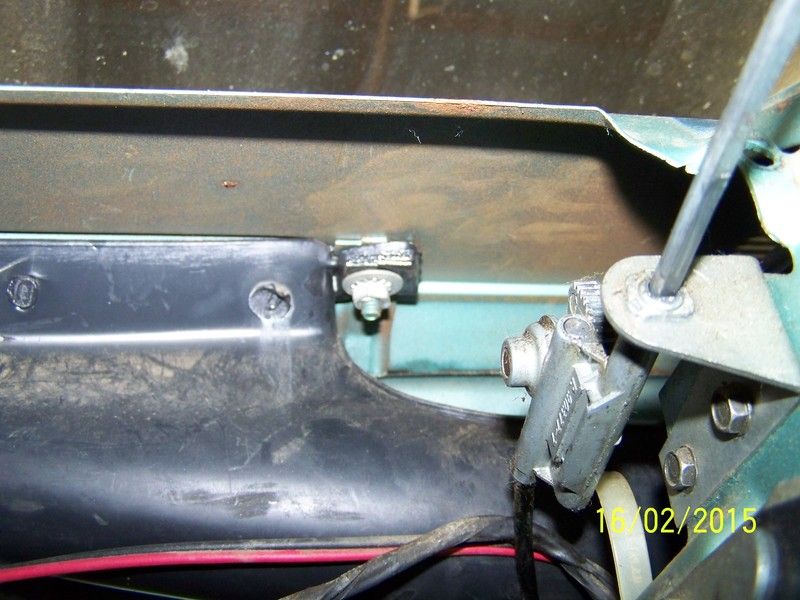 To remove the cluster, take the screws out of the top cover. They are under the "eye brow" over the cluster. Use a short Phillips screwdriver. This will reveal a stud with a nut on each side of the top. There are another pair of studs about half-way down the cluster, one on each side. Luckily, this car didn't have the nuts on those studs. I don't recall if my car had the nuts or not. The cluster on this car may have been removed at some earlier date and the nuts not reinstalled. Doesn't hurt to leave them off. There are four screws in the bottom of the cluster housing that need to come out also. After that, unscrew the speedometer cable. Take the nuts off the steering column support to the dash so you can lower the column a bit. On a stick shift car you only need to go down a little. The indicator quadrant of an auto car is in the way though. I managed to squeeze the cluster past it, but it was tight! Getting it back on will require holding it "just right" to get it back in. You can only remove the indicator by taking the steering wheel off. I decided to try without going through that! You also need to pull the knobs off all the controls and levers, and the headlight switch out before removing the cluster. The knobs are held on by tiny set screws, flat blade screwdriver. Not precision size, but small. The knobs on the levers use a small Phillips screw. The headlight switch has a button in the center of the switch. Push that and pull the knob with rod out. It might need a little turning to get out, and the button can be hard to find, but it's there. You will need to pull the lights for the heater controls out too. They just pull out, bulb and socket, push back in when reassembling. If you're concerned about any of the cluster bulbs now would be a good time to replace them -- all of them! There are maybe six in the cluster, then the two heater control lights. What I didn't do is unplug the electric connector. They can be delicate after all these years. I've had wires stick to the cluster and pull out of the harness connector body. Not hard to put back in, but no need to pull it. You can swing the cluster to the side with the harness still attached. Like this: 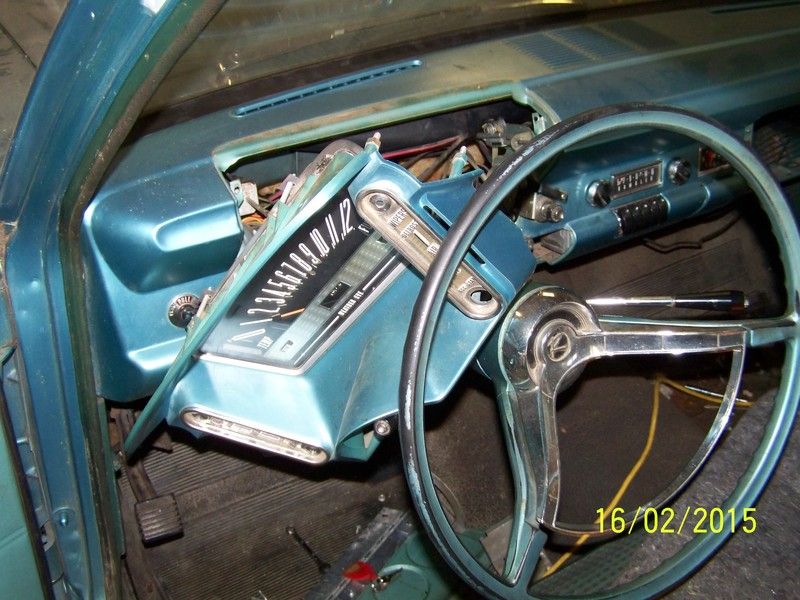 Once you have the cluster out of the way you can get to the driver's side defroster duct nuts. Get them off, then work the duct out the passenger side. It's tough, so I'll excuse use of a few choice words -- just make sure the area is clear of kids. The duct slides right off the center duct from the heater box. If you have AC the AC duct needs to come off first, but that's not to hard. Remove the screws around the dash vents, lift them out of the way, then pull the feed duct up through the hole. From memory, I'm pretty sure that's how it goes. |
|
|
Frank Swygert
|
|
|
|
|
farna
Supporter of TheAMCForum
Moderator Lost Dealership Project Joined: Jul/08/2007 Location: South Carolina Status: Offline Points: 19676 |
Post Options
Thanks(0)
Quote Reply
Posted: Feb/18/2016 at 4:58pm |
|
Now that everything is out of the way, you need to trim the rusted areas off. I used a die grinder with a 4" cut-off wheel. A Dremel or similar tool will work great, just make sure you have a few of those little wheels. This is 18 gauge steel, not thin stuff! You CAN do it with hand tools like aviation snips (the yellow/green/red "tin snips"), but it's tough. I did my car that way, but didn't need to go up too far in front, and the back side was basically rusted off and easy to remove.
Here's a pic of mine before painting. You can see I didn't have to cut up far. Man, this was much easier with the dash out!! Cutting by hand with the dash in will be tough. Forget using something like a jig saw for that long side to side cut, but you might get the front to back end cuts done with one with the dash in. A jig saw would probably work with the dash out. One of those oscillating flush cut saws might do the trick, but get a couple blades, and some hearing protection.  Back to the current job! Here's a photo after the bad parts have been cut out: 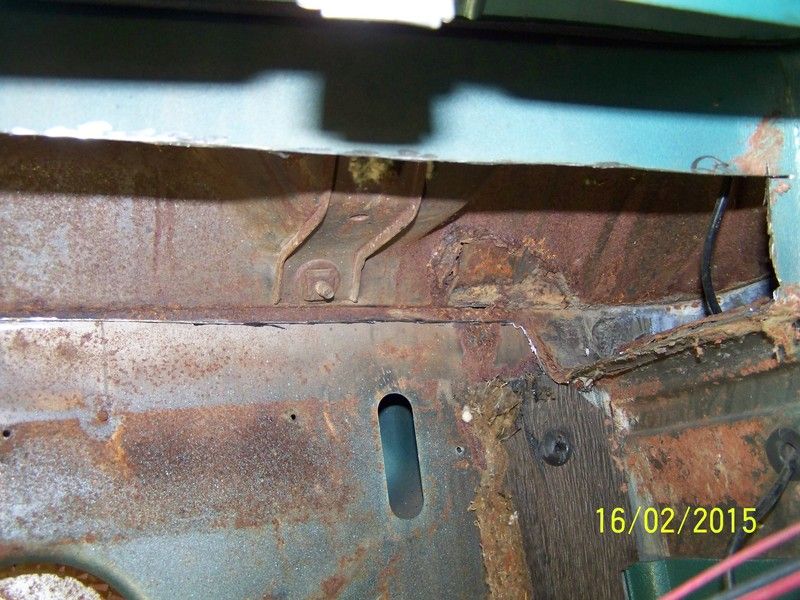 Here's what was left of what was cut out, after all the rusted pieces had fallen off, and my die grinder with cut-off wheel. If you use something like this WEAR SAFETY GLASSES! Gloves aren't a bad idea either. 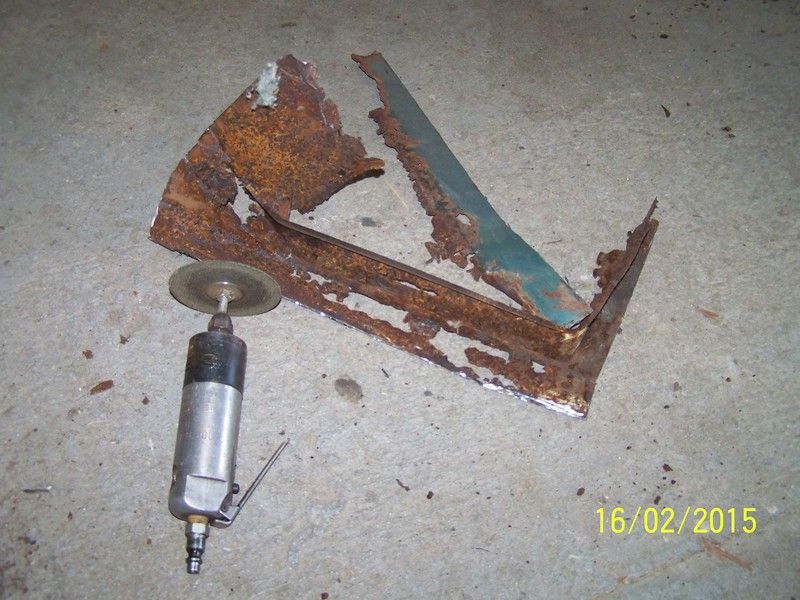 You can see about a 1/4" left on the back against the firewall. Don't worry about that, just flatten it with a small hammer. The back of the cowl originally had a flange that sticks between flanges on the firewall and upper cowl, and then all three are spot welded together. I made the front and right side (far passenger side) cuts first, then made a cut to get the bottom and front off. Second was the driver's end front to back cut, and enough to get that out. To cut the back along the firewall I bent that piece down and against the firewall as much as possible then made the cut. Could only hold the wheel so close to the top of the dash, especially against that brace with the bolt (a hinge bolt) sticking through. Removing the hinge bolt won't help, the brace is mainly in the way. Oh yeah, there is some rust in that upper corner. That where the fender gusset connect under the hood. Don't know why these things tend to rust there, probably didn't get much (if any) primer in that area when dipped -- probably had an air pocket on the hood side. It's not a big deal though. Edited by farna - Feb/18/2016 at 5:06pm |
|
|
Frank Swygert
|
|
|
|
|
farna
Supporter of TheAMCForum
Moderator Lost Dealership Project Joined: Jul/08/2007 Location: South Carolina Status: Offline Points: 19676 |
Post Options
Thanks(0)
Quote Reply
Posted: Feb/18/2016 at 5:14pm |
|
This looks like a lot, but it's not a tough repair. I took my first photo at 2:43. I took that last one with the cut pieces and tool at 3:56 -- just an hour and 13 minutes! And I was pausing to take pics! Sure seems like it took longer... At this point I took a five minute break -- next photo was at 4.04. Up to this point everything was done in a single day -- and the next few posts as well. I'm taking enough of a break from posting to eat some dinner! I think it's taking nearly as long to post as it did for the work...
|
|
|
Frank Swygert
|
|
|
|
|
farna
Supporter of TheAMCForum
Moderator Lost Dealership Project Joined: Jul/08/2007 Location: South Carolina Status: Offline Points: 19676 |
Post Options
Thanks(0)
Quote Reply
Posted: Feb/18/2016 at 6:11pm |
|
Time to get back to it!
On my car I made my own patch panel. For this one, I bought one from Peter Stathes (www.amcrambler.com). Cost is $65, $15 to ship to SC, so total was $80. It's a well made piece with the lip spot welded on. It works well, and is made from 18 gauge steel. I had to do some fitting, but it was worth the effort. Making a piece from scratch took quite a bit of time, and I used a lighter gauge galvanized steel (20 gauge, more common than 18 gauge). Here are photos of the piece as it arrived: 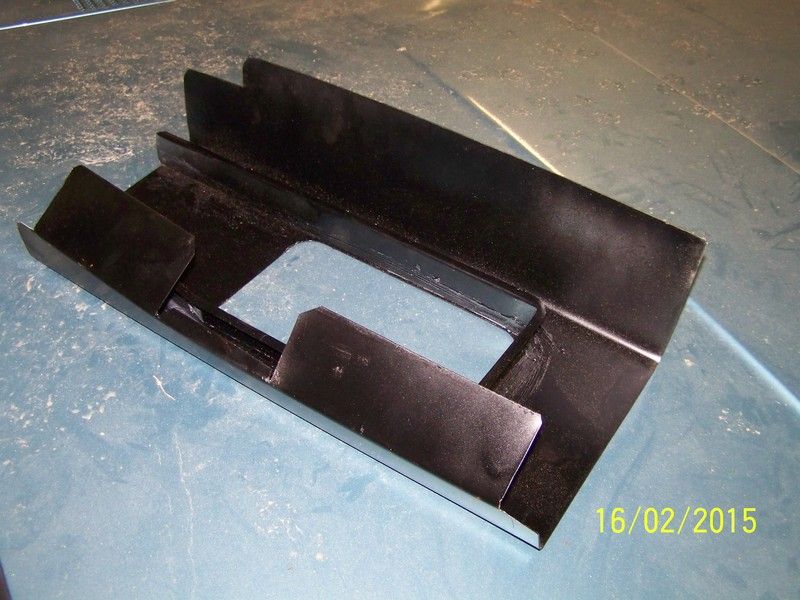 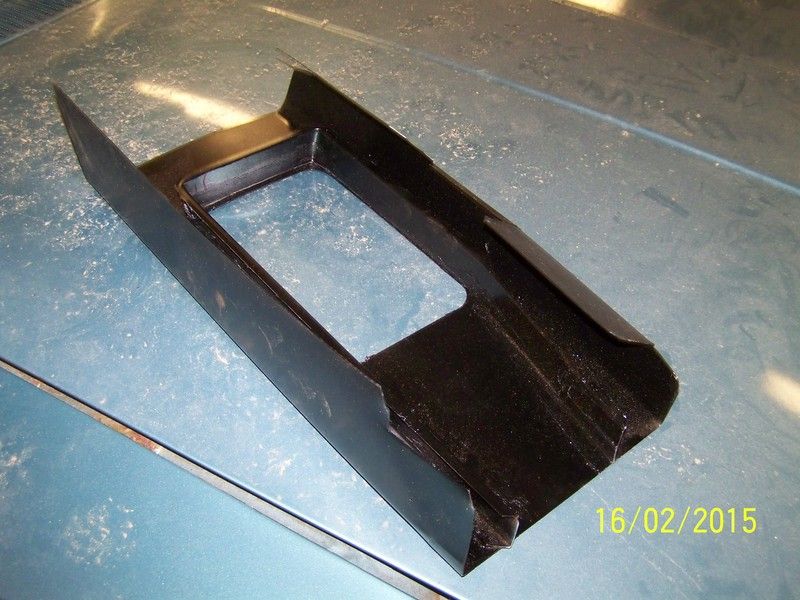 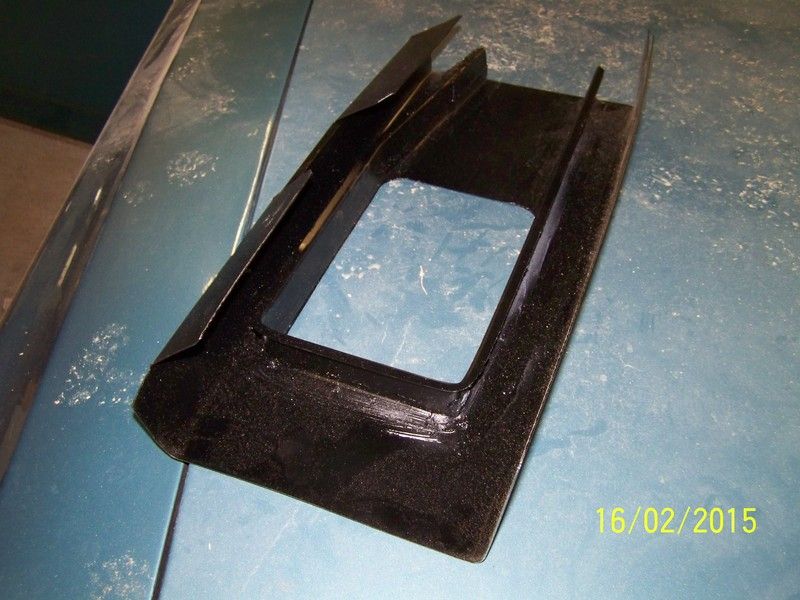 Do a bit of measuring and test fitting first, then determine what needs to be trimmed away to make it fit. There is a good bit of extra material on the left, back, and front. The right side will fit right against the right kick panel wall. When you cut the old out you should leave about an inch of the old floor if possible to fasten to. I fit that end above the floor, everything else on the outside. I found the patch panel to be a bit wide on the driver's end. Could be a difference in the 63 and 64 over the 65 and 66 models, or just the way the patch is made -- I'm not sure as I've never had a 65-66 apart. I made a cut in the floor and bent it up so I could bend the "front" side (side toward glove box) in and run a screw through both the new pieces into the end of the original cowl floor. I also had to trim the "back" side (firewall) pieces to clear the hood hinge brace. The end that goes above the stub of the right end had to have the notch cut so that the end could go to the inside and the back to the outside of the original cowl floor. On my car I had all the patch panel on the inside, but due to the patch panel being a bit wider on the left I couldn't do that this time. Trim a little, test fit, trim a little more, test fit, etc. -- as many times as it takes! You can always trim a little, but if you trim too much it's hard to put it back! Photos of the trimmed patch panel: 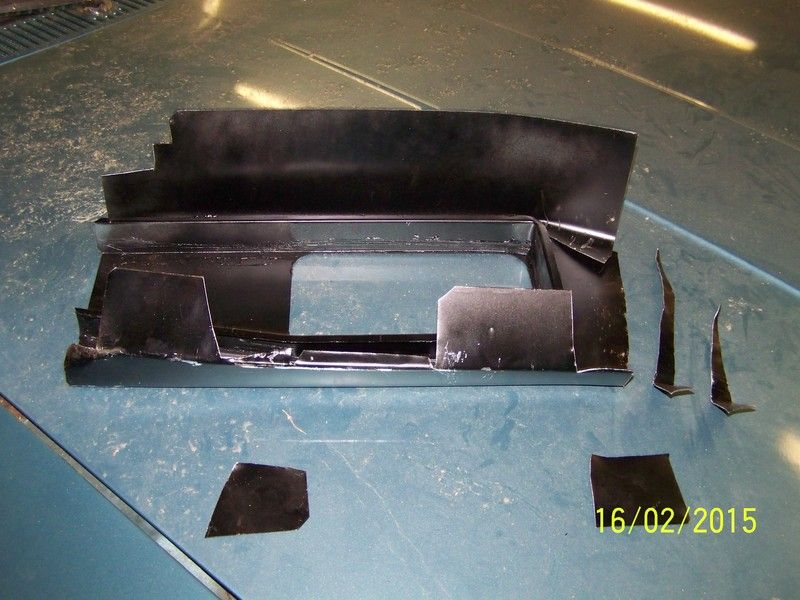 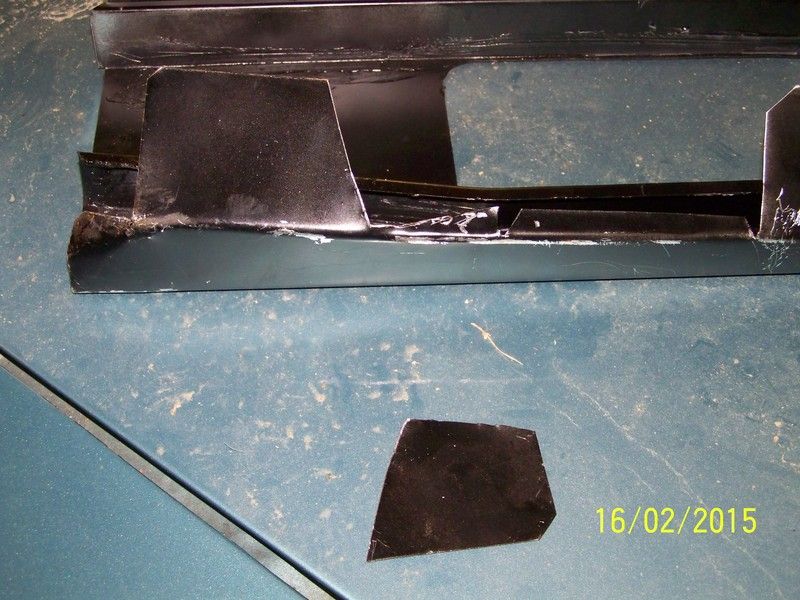  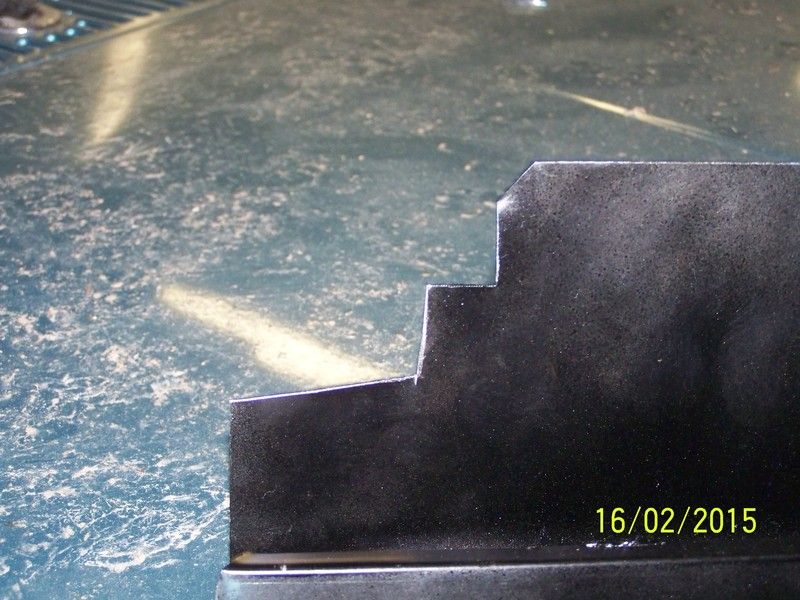 Take a close look at the lower left of the panel in the first and second photos. I had to curve the end in with a pair of pliers i order to ease it in the hole in the far right corner. Note the long thin triangular pieces to the right in the third photo. I had to trim the front (firewall) side a bit shorter to clear the center air distribution box. You could remove that box, but I elected not to. There was still plenty of overlap on that end. You can also see the bent, overlapped end I previously mentioned. The bottom photo shows the notch for the right rear side. The patch panel comes with a notch already, but it was a lot higher than I needed. The one that comes in the panel is the top "step". Those "wings" on the firewall (front) side of the panel are to fasten to the upper cowl. They will need to be trimmed around the hood hinge brace and bent "out" some so they fit close against the upper cowl. You can't get to them to fasten from the inside. If they need to be fastened it has to be from under the hood. Drill holes in the upper cowl in the right area and through the "wings". You will need a helper to push the "wings" against the cowl, or wedge a piece of wood in the heater opening against them to hold, at least for that first hole. If held tight against the cowl you can use self-drilling screws, otherwise drill the cowl and "wings" to use pop rivets or regular sheet metal screws. Edited by farna - Nov/26/2018 at 8:22am |
|
|
Frank Swygert
|
|
|
|
|
farna
Supporter of TheAMCForum
Moderator Lost Dealership Project Joined: Jul/08/2007 Location: South Carolina Status: Offline Points: 19676 |
Post Options
Thanks(0)
Quote Reply
Posted: Feb/18/2016 at 6:50pm |
|
Now that we have the panel trimmed to fit and are happy with the fit, it's time to place the panel. The first step is to apply plenty of sealer. You will end up wiping 1/3 to 1/2 off, but you want to make sure there is plenty in the seams. Apply on the stub floor in the right kick panel opening, and all around the patch where it will overlap the original cowl floor. Note that I also applied a generous bead where the panel meets the firewall. The 18 gauge patch panel is stiff enough that I didn't attach the "wings" to the upper cowl at all. I just sealed it against it. I don't anticipate this ever being a problem. You might want to though. On my car with the 20 gauge panel I did rivet through the cowl, but this one is so much stiffer that it's just not necessary.
Also note that there is no sealer along the top of the back side (glovebox side). On the patch panel that side isn't against the original cowl panel all the way down. Starts out against the original on the right (kick panel) end, but gets about 1/2" away on the left end. Not sure why, as I noted earlier, might be a difference in 63 models and the others (or 63-64 vs. 65-66). The patch goes up almost to the underside of the dash. I don't think the slight gap at the top will hurt a thing, just a little air leakage into the car that doesn't go through the heater box, but not much. I may use some aluminum foil type duct tape to seal that edge. That tape won't come off -- I used it to patch the cracked edges of my plastic glove box years ago (2003!) and it's still holding. It's nothing like ordinary duct tape! You can find it in the actual air duct section at Lowe's or other building supply stores. Real good stuff to have around! 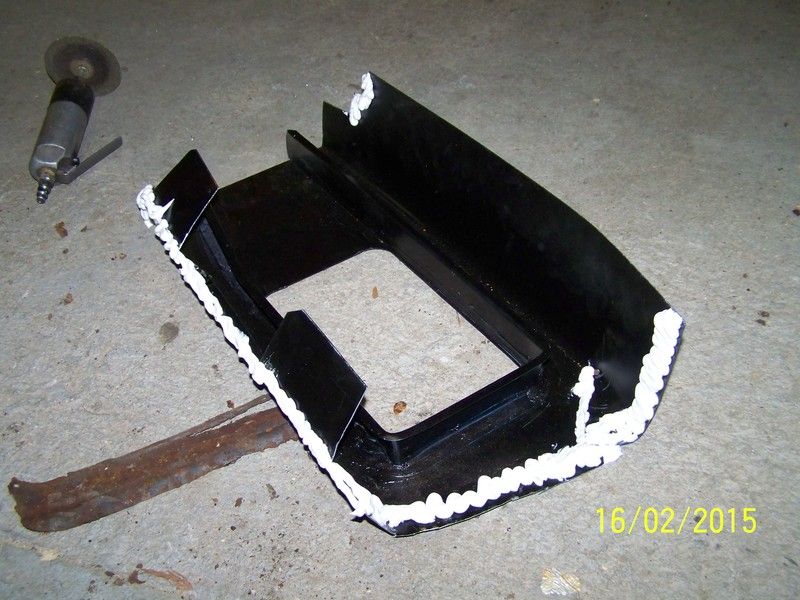 Once the sealer is in place, carefully lift the patch panel up and insert in place. Be ready with a drill and self drilling screws, or a bit and at least one regular sheet metal screw. Once you have it in place you'll have to hold it while putting that first screw or hole in (I did the back left corner first, the one that was bent in and overlapped). Get that screw in, even if you intend to replace it with a rivet later. Once that is in get up and take a couple minute break, you deserve it! After your break/stretch from working in the floor, put some more screws or rivets in the bottom. I put two more on the left side, and three along the right. You need at least one in the left top corner in the rear panel where that overlap had to be made to hold it in. This is a real PITA with the dash in! You might want to drill the holes, at least in the patch panel, BEFORE applying sealer and putting in final position. It was hard getting a drill bit to "bite" at the angle necessary to go through the glove box opening in that upper corner. The right rear corner, the one with the notch in the panel where part goes inside, part out, didn't need a screw. Once you have the panel firmly screwed in place wipe off the excess sealer. I smeared it right back along the seams, making sure any spaces in overlaps was filled. Be careful, as those cut metal edges are sharp! Don't apply too much force when wiping with a finger. As I stated earlier, I used a good 25 year acrylic (paintable) caulk. Once it cures I'll paint it black. I also sprayed the inside of the cowl with black spray paint before putting the patch panel in. There was a little surface rust all over. The paint will slow down if not completely stop more rust. A brush on oil based paint like Rustoleum, or some rust conversion primer then paint would be a better option. If you use something like that let it thoroughly dry before applying sealer and fitting the patch panel. 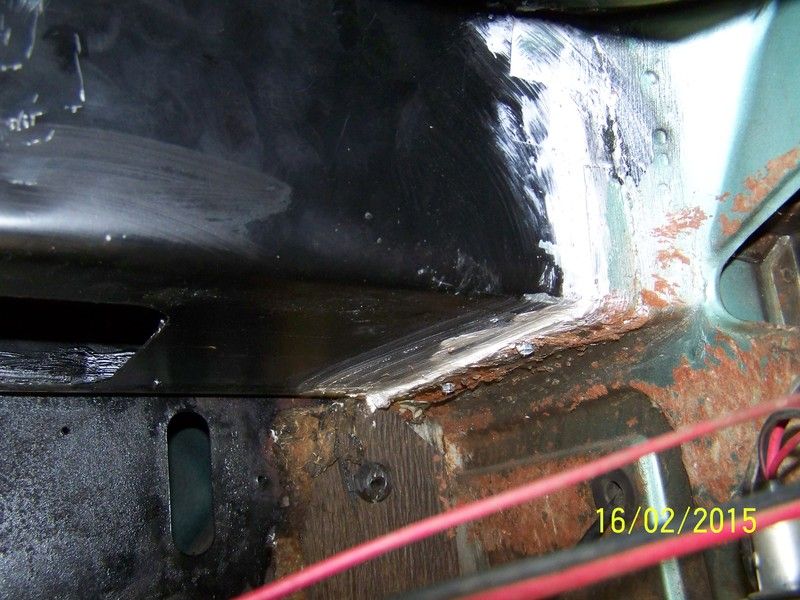 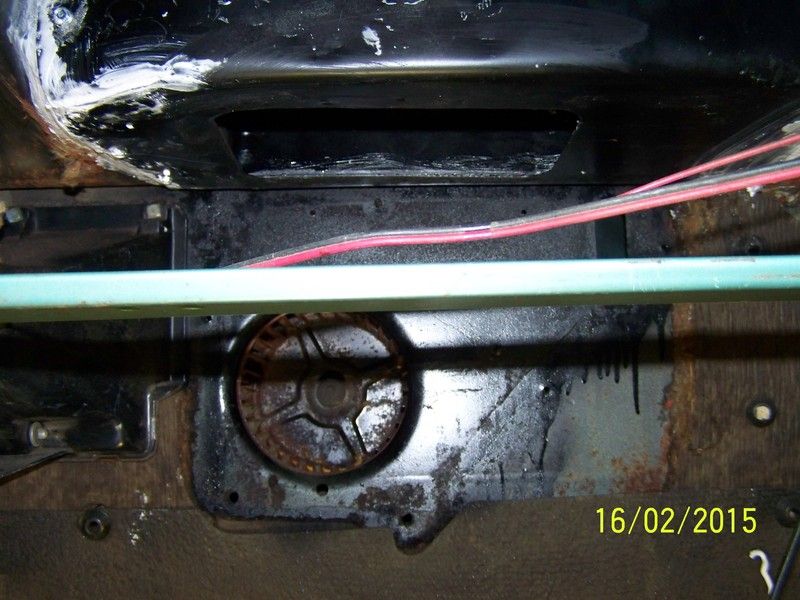 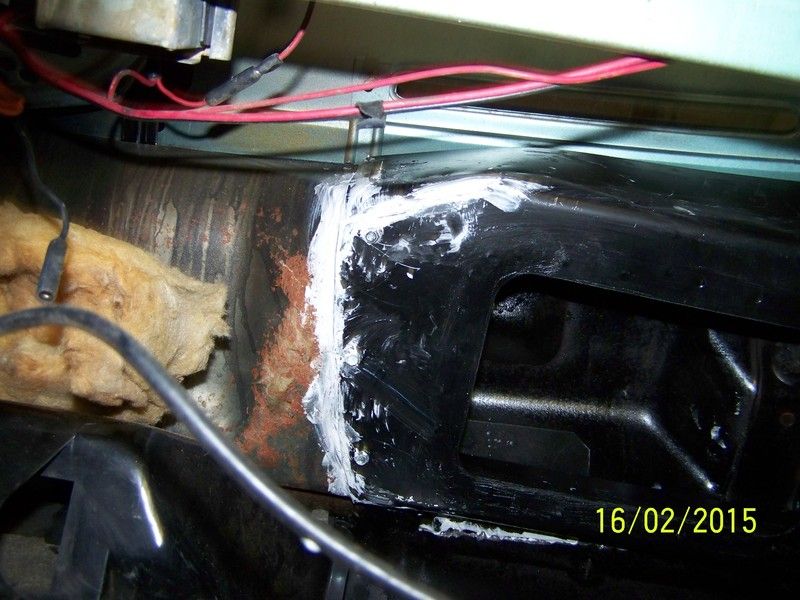 That's as far as I got before I had to quit. The last photo was taken at 5:22 -- 3 hours and 39 minutes from start until patch panel in place, and I was taking a few minutes break here and there, not in a hurry, and taking pics along. So plan on at least four hours to get this far, and another couple hours to put everything back together -- if you just spray paint and don't have to wait more than a few minutes for the paint to dry enough to finish. I'll take photos and document the reassembly when I get a chance to do it in the next week or so. Will be interesting to see just how long it takes, with taking plenty breaks and photos, of course. One more thing -- I used screws and sealer, didn't even try to weld. The interior is in this car, that's one reason I didn't want to weld. You can weld it, just use protective fireproof covering. It will be hard to weld in this tight area if the dash is still in. If the dash is out it won't be so bad. The screws and sealing is so much easier and faster though, and will last. As I said, I did mine back in 2003, and my car was a daily driver kept outside from 2003 through 2007, had no garage or carport before I retired. Edited by farna - Feb/18/2016 at 7:01pm |
|
|
Frank Swygert
|
|
|
|
|
farna
Supporter of TheAMCForum
Moderator Lost Dealership Project Joined: Jul/08/2007 Location: South Carolina Status: Offline Points: 19676 |
Post Options
Thanks(0)
Quote Reply
Posted: Feb/18/2016 at 7:27pm |
|
As a side note, here are photos of how I made my patch panel back in 2003. I used all hand tools, and made the bends with pliers or by hand. I had a pair of wide pliers for the 90 degree bends, like these:
 These have 3-1/8" wide jaws and are pretty common. You can get seaming pliers with jaws in the 5" to 9" range that work better. Eastwood sells a pair of 6" jaw seaming pliers for under $20 (http://www.eastwood.com/6-straight-seaming-plier.html?fee=7&fep=26082&SRCCODE=GA220010&adpos=1o1&creative=83580269820&device=c&matchtype=&network=g&gclid=CP2P04bUgssCFUc2gQodBnMKuQ) I cut the hole for the heater opening about 1" smaller all around, then cut the corners at 45 degrees and bent the sides up. I made little corner pieces and folded them over for the corners, and crimped tight with pliers, then used generous amounts of sealer to make them air and water tight. Hey, no floor leaks, 13 years later... 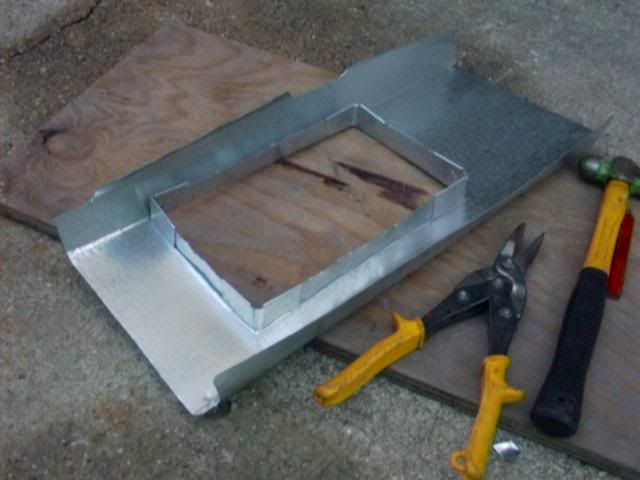 Darn... don't have more pics on this computer! If anyone needs them I'll get more. I think this one shows enough. The 20 gauge air duct material is a lot easier to work with than the 20 gauge plain steel, but needs a bit more support. You can tell from this and the installed photo that I didn't go far up on the back, and my "wings" are a lot shorter too. As noted earlier, I went through the cowl under the hood with some rivets. If you use rivets make sure to plug the holes with sealer too. |
|
|
Frank Swygert
|
|
|
|
|
Post Reply
|
Page 123> |
 Tweet
Tweet
|
| Forum Jump | Forum Permissions You cannot post new topics in this forum You cannot reply to topics in this forum You cannot delete your posts in this forum You cannot edit your posts in this forum You cannot create polls in this forum You cannot vote in polls in this forum |


")


 Click for TheAMCForum Rules
 Topic Options